Streptomyces:
Streptomyces are gram positive, spore-forming bacteria found in soil. They are characterized by their tough, leathery, frequently pigmented colonies and their filamentous growth. When first discovered, these organisms were thought to be fungi, but closer examination revealed a lack of a nuclear membrane and the presence of peptidoglycan, demonstrating their prokaryotic origin. Streptomyces are chemoheteroorganotrophs, growing best at 25°C and pH 8-9. They are capable of using complex organic materials as carbon and energy sources and are involved in the breakdown of these products in the soil. This degradative ability makes these bacteria pivotal in the production of fertile soil for agriculture. They also give soil its characteristic smell by the production of a class of volatile low molecular weight compounds called geosmins.
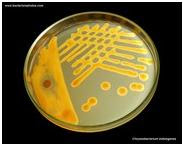
In the laboratory, different isolates were found to produce numerous compounds capable of inhibiting or killing other microorganisms. Many of these Figure 1 shows some examples of streptomycetes
Figure 1: An example of streptomycetes

A photomicrograph of Streptomyces vegetative cells and spores.
In this section, we describe the enrichment of this group of organisms and test several isolates for their antibiotic producing ability. Dried soil, a great source of inoculum for Streptomyces, will be plated directly onto Actinomycete Isolation Agar (AIA). Since an enrichment step is not necessary, what does that tell you about the population of Streptomyces in the soil? AIA contains starch and sodium caseinate as sole carbon and energy sources. Only organisms capable of degrading these complex polymers (mostly molds and streptomycetes) are able to grow. Sodium propionate (a preservative sometimes present in commercial bread) is added to inhibit the growth of molds. Incubation at 30°C for more than five days results in the formation of Streptomyces colonies that are recognized by their characteristic appearance.
Isolation protocol
Period 1
Materials
Soil sample
3 0.85% NaCl dilution blanks (9 ml)
3 plates Actinomycete Isolation Agar (AIA) / Starch Casein Agar (SCA)
Composition of Starch Casein Agar:
Ingredients | Grams/Litre |
Soluble Starch | 10.0 |
Casein | 0.30 |
Potassium nitrate (KNO3) | 2.00 |
Di-potassium hydrogen orthophosphate (K2HPO4) | 2.00 |
Magnesium sulphate (MgSO4.7H2O | 0.05 |
Calcium carbonate (CaCO3) | 0.02 |
Ferrous sulphate (FeSO4.7H2O) | 0.01 |
Agar-agar | 20.0 |
Final pH: 7.2 | |
- Weigh out one gram of soil and place it in one of the dilution blanks. Vortex the suspension for 1 min. Serially dilute the suspension to 10-3 using the other 2 saline dilution blanks.
- Label the 3 plates of AIA, 10-1, 10-2, 10-3 and 10-4. Plate 0.1 ml from each of the 3 dilution blanks onto the appropriate plate of AIA and spread the inoculum using a sterile hockey stick.
- Incubate the plates at 30°C for 5-7 days.
Below is shown the appearance of a Streptomyces isolation plate after 5 days of incubation
Period 2
Materials
5 AIA plates
Figure 2: AIA after incubation

This AIA plate was inoculated with soil from near
Figure 3: closeup of a typical streptomyces colony

Note the colorfulchalky/dusty appearance. The colony is hard, not gummy, and does not easily lift from the agar.
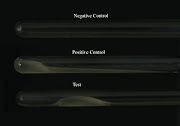
Figure 4: wet mount of a Streptomyces colony

A Streptomyces colony under the phase microscope. Notice the long branched hyphae in the picture. This picture was taken at 1000x and enlarged 2 fold.
- Examine the AIA plates and look for typical Streptomyces colonies. They are small, opaque, compact, frequently pigmented (brown, yellow, pink, etc.), often leathery, and appear dry and dull looking. See Figure 1 for examples. Typically, a depression in the agar surface will be observed around the colony. Avoid molds. They usually form much softer, fuzzy colonies if present. AIA has propionic acid in it to inhibit most molds, but some species are resistant to this inhibitor.
- Prepare a wet mount. Good Streptomyces candidates will be difficult to remove from the agar with the inoculating needle or loop and upon observation under the microscope will reveal a multitude of spores with a few filamentous cells, Figure 4.
- Select five potential Streptomyces colonies and streak each for isolation onto a plate of AIA. Incubate the plates at 30°C for 5-7 days.
Period 3
Materials
6 plates of Penassay Agar
Culture of Streptomyces griseus, an active antibiotic producer
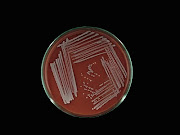
Figure 5: Streaking pattern for the antibiotic test

Diagram of the appropriate streaking technique for the Penassay plates. (A) The placement of the Streptomyces colonies. (B) The placement of the test cultures. Note that there is a 5-7 day incubation between streak A and streak B.
Figure 6: Streaks for isolated colonies on penassay agar

The appearance of penassay agar after streaking for isolated colonies of Actinomycetes.
- Examine each Streptomyces isolate and describe its colony morphology. Verify that it is indeed free from mold, Figure 7.
- Pick a well isolated colony from each plate and streak onto Penassay Medium. Place a single streak down the middle of the plate for each isolate; do not streak for isolated colonies (Figure 4). The test cultures will be added to the Penassay plate next period. Also streak a plate of the known culture of S. griseus onto the last Penassay plate in a similar manner. Incubate at 30°C for 5-7 days.
Period 4
Materials
Broth cultures of 5 test organisms
Figure 7: An appropriately grown test plate
Example plates after growth of the Streptomyces test strains. Note the full growth completely along the streak line. There is a minor contaminant in the left sample, but it should not interfere with analysis.
- Examine the plates for growth and freedom from contamination. Check the cultures for the production of geosmins (the smell we associate with soil) by carefully smelling the plates along the edge while leaving the plates closed. Figure 7 shows some examples of a good test plates
- Cross-streak the plates with each of the 5 test cultures. Start each streak near the edge of the plate and streak toward the Streptomyces colony (Figure 4). Finish the streak near, but not touching, the Streptomyces streak. Do not reverse the direction of the streak and only streak one time!
- Incubate at 30°C for 2 days
Period 5
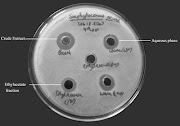
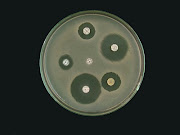
Figure 8: Antimicrobial production by isolates
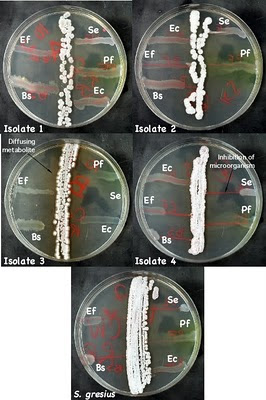
Examples of microbes that have been isolated and their inhibition of test microbes. Isolate 3 is secreting a brown metabolite into the medium. Isolate 4 is secreting an antimicrobial into the medium that is inhibiting S. epidermidis, E. faecalis, and B. subtilis. Ec - E. coli, Pf - P. flourescens, Bs - B. subtilis, Se - S. epidermidis, and Ef - E. faecalis.
- Observe the S. griseus plate and look for growth inhibition in the test cultures due to antibiotic production. If a test culture is inhibited, there should be a decrease in the amount of growth as you move in toward the Streptomyces streak. Examine your Streptomyces, do any of the isolates show production of antibiotics. Figure 8 shows an example of a Streptomyces isolate that inhibit several strains.
- Examine the plate above. Are any of the isolates antibiotic producers? What further tests would need to be done to find out?
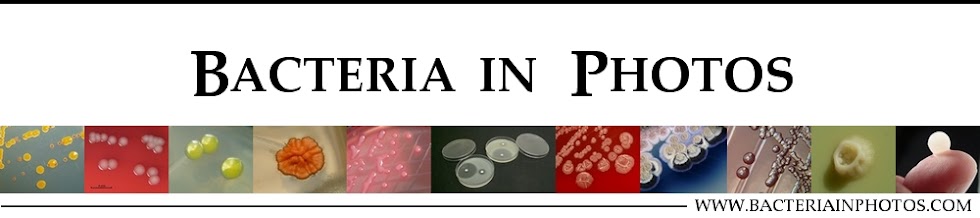
Secondary screening
Secondary screening is performed by agar well method against the standard test organisms. Fresh and pure culture of each strain from the primary screening will be inoculated in starch casein broth and incubated at accordingly for 7 days in water bath shaker.The visible pellets,clumps or aggregates and turbidity in the broth will confirm growth of the organism in the flask.Contents of flasks will be filtered through Whatman no. 1 filter paper.The filtrate will be used for the determination of anti-microbial activity against the standard organisms by agar well method.
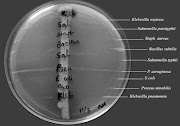
Figure 9: Secondary screening of streptomyces strains against test organisms

Reference:
http://inst.bact.wisc.edu/inst/index.php?module=Book&func=displayarticle&art_id=93